前言
最早19年的时候在Youtube上看到Google的视频说过MotionLayout,当时看到第一感觉就是很酷,能用xml来描述两个布局切换的过程,还能定义关键帧,最近有时间来好好研究一下。
什么是MotionLayout
Motion代表动作,说明MotionLayout处理布局之间的“运动”,这样说不够贴切,准确来说应该是处理布局之间的转换(比如从布局A切换到布局B的一个转换过程),不过除了描述布局之间的转换之外,MotionLayout还能够为任何布局属性添加动画效果。
MotionLayout是ConstraintLayout的子类,可以把它理解为专门用来处理布局间复杂动画的ConstraintLayout。
所谓的复杂动画如果用语言来组织一下就是,它描述了从布局A到布局B的一个切换过程。
不过遗憾的是MotionLayout只能对其直接子布局进行操作,如果是嵌套布局的话就无法起作用。
开始使用
本文以Kotlin及AndroidX为示例。
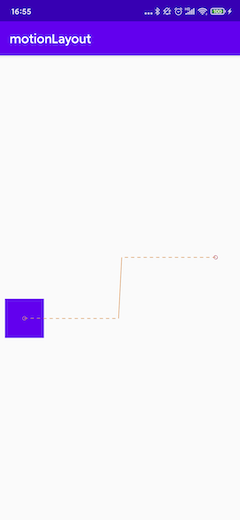
基础示例:

添加依赖。
MotionLayout在ConstraintLayout2.0版本加入,所以必须依赖ConstraintLayout2.0及以上版本,截止该文发布时,最新版本为2.0.1。
1
implementation 'androidx.constraintlayout:constraintlayout:2.0.1'
创建 MotionLayout 文件
语法
1
2
3
<androidx.constraintlayout.motion.widget.MotionLayout/>
    xxx
</androidx.constraintlayout.motion.widget.MotionLayout>
基础示例:
1
2
3
4
5
6
7
8
9
10
11
12
13
14
15
16
<?xml version="1.0" encoding="utf-8"?>
<androidx.constraintlayout.motion.widget.MotionLayout xmlns:android="http://schemas.android.com/apk/res/android"
    xmlns:app="http://schemas.android.com/apk/res-auto"
    xmlns:tools="http://schemas.android.com/tools"
    android:layout_width="match_parent"
    app:layoutDescription="@xml/scene_basic"
    app:showPaths="true"
    android:layout_height="match_parent"
    tools:context=".MainActivity">

    <View
        android:layout_width="60dp"
        android:layout_height="60dp"
        android:background="@color/colorPrimary"/>

</androidx.constraintlayout.motion.widget.MotionLayout>
app:layoutDescription代表引用一个 MotionScene
其他MotionLayout属性:
app:applyMotionScene="boolean"表示是否应用MotionScene。此属性的默认值为true。app:showPaths="boolean"表示在运动进行时是否显示运动路径。此属性的默认值为false。app:progress="float"明确指定转换进度。0(转换开始)到1(转换结束)之间的任意浮点值。app:currentState="reference"指定具体的ConstraintSet。app:motionDebug显示与运动有关的其他调试信息。可能的值为“SHOW_PROGRESS”、“SHOW_PATH”或“SHOW_ALL”。
创建 MotionScene
语法:
1
2
3
4
5
6
7
8
9
10
11
12
13
14
15
16
17
18
19
20
21
22
23
24
25
26
27
28
29
30
31
32
33
34
35
36
<MotionScene xmlns:android="http://schemas.android.com/apk/res/android"
    xmlns:app="http://schemas.android.com/apk/res-auto">

    <Transition
        app:constraintSetStart="@id/startId"
        app:constraintSetEnd="@id/endId"
        app:duration="1000">

        <OnSwipe />
        (或者<OnClick/>)

        <KeyFrameSet>
            <KeyPosition />
            <KeyAttribute />
            <KeyCycle />
            <KeyTimeCycle />
            <KeyTrigger />
        </KeyFrameSet>
    </Transition>

     <ConstraintSet android:id="@+id/startId">
        <Constraint android:id="@id/viewId">
            <CustomAttribute />
            <PropertySet />
            <Transform />
        </Constraint>
    </ConstraintSet>

    <ConstraintSet android:id="@+id/endId">
        <Constraint android:id="@id/viewId">
            <CustomAttribute />
            <PropertySet />
            <Transform />
        </Constraint>
    </ConstraintSet>
</MotionScene>
MotionScene 是一个 XML 资源文件,其中包含相应布局的所有运动描述。为了将布局信息与运动描述分开,每个 MotionLayout 都引用一个单独的 MotionScene,MotionScene 中的定义优先于 MotionLayout 中的任何类似定义。
在res目录下创建xml文件夹用于放置MotionScene文件。
基础示例:
1
2
3
4
5
6
7
8
9
10
11
12
13
14
15
16
17
18
19
20
21
22
23
24
25
26
27
28
29
30
31
32
33
34
35
36
37
38
39
<?xml version="1.0" encoding="utf-8"?>
<MotionScene xmlns:android="http://schemas.android.com/apk/res/android"
    xmlns:app="http://schemas.android.com/apk/res-auto">

    <Transition
        app:constraintSetEnd="@id/end"
        app:constraintSetStart="@id/start"
        app:duration="1000">

        <OnSwipe
            app:dragDirection="dragRight"
            app:touchAnchorId="@id/view"
            app:touchAnchorSide="right" />

    </Transition>

    <ConstraintSet android:id="@+id/start">
        <Constraint
            android:id="@id/view"
            android:layout_width="64dp"
            android:layout_height="64dp"
            android:layout_marginStart="8dp"
            app:layout_constraintBottom_toBottomOf="parent"
            app:layout_constraintStart_toStartOf="parent"
            app:layout_constraintTop_toTopOf="parent" />

    </ConstraintSet>

    <ConstraintSet android:id="@+id/end">
        <Constraint
            android:id="@id/view"
            android:layout_width="64dp"
            android:layout_height="64dp"
            android:layout_marginEnd="8dp"
            app:layout_constraintBottom_toBottomOf="parent"
            app:layout_constraintEnd_toEndOf="parent"
            app:layout_constraintTop_toTopOf="parent" />
    </ConstraintSet>
</MotionScene>
说明:
<Transition>包含运动的基本定义。motion:constraintSetStart和motion:constraintSetEnd指的是运动的端点。这些端点在MotionScene后面的<ConstraintSet>元素中定义。motion:duration指定完成运动所需的毫秒数。
<OnSwipe>代表通过轻触控制运动。motion:touchAnchorId代表需要控制滑动并拖动的视图。motion:touchAnchorSide表示从哪侧拖动视图。motion:dragDirection表示拖动的进度方向。例如,motion:dragDirection="dragRight"表示当向右拖动时,进度会增加。
<ConstraintSet>是定义描述需要操作视图运动的各种限制条件的位置。
插入属性
在 MotionScene 文件中,ConstraintSet 元素可包含在转换期间插入的其他属性。除了位置和边界之外,MotionLayout 还支持插入<PropertySet>、<Transform>
PropertySet包括visibilityalphamotionProgress
Transform包括visibilityelevationrotationrotationXrotationYtranslationXtranslationYtranslationZscaleXscaleY
例如:
修改MotionScene
1
2
3
4
5
6
7
8
9
10
11
12
13
14
15
16
17
18
19
20
21
22
23
24
25
26
27
28
29
30
31
32
33
34
35
36
37
38
39
40
41
42
43
44
45
46
47
48
<?xml version="1.0" encoding="utf-8"?>
<MotionScene xmlns:android="http://schemas.android.com/apk/res/android"
    xmlns:app="http://schemas.android.com/apk/res-auto">

    <Transition
        app:constraintSetEnd="@id/end"
        app:constraintSetStart="@id/start"
        app:duration="1000">

        <OnSwipe
            app:dragDirection="dragRight"
            app:touchAnchorId="@id/view"
            app:touchAnchorSide="right" />

    </Transition>

    <ConstraintSet android:id="@+id/start">
        <Constraint
            android:id="@id/view"
            android:layout_width="64dp"
            android:layout_height="64dp"
            android:layout_marginStart="8dp"
            app:layout_constraintBottom_toBottomOf="parent"
            app:layout_constraintStart_toStartOf="parent"
            app:layout_constraintTop_toTopOf="parent">
            <PropertySet android:alpha="1" />
            <Transform
                android:scaleX="1"
                android:scaleY="1" />
        </Constraint>
    </ConstraintSet>

    <ConstraintSet android:id="@+id/end">
        <Constraint
            android:id="@id/view"
            android:layout_width="64dp"
            android:layout_height="64dp"
            android:layout_marginEnd="8dp"
            app:layout_constraintBottom_toBottomOf="parent"
            app:layout_constraintEnd_toEndOf="parent"
            app:layout_constraintTop_toTopOf="parent">
            <PropertySet android:alpha="0.1" />
            <Transform
                android:scaleX="0.5"
                android:scaleY="0.5" />
        </Constraint>
    </ConstraintSet>
</MotionScene>
效果:

自定义属性
在 <Constraint> 中,可以使用 <CustomAttribute> 元素为不仅仅与位置相关的属性或 View 属性指定转换。
如:
1
2
3
4
5
6
 <Constraint
        android:id="@id/xxx" ...>
        <CustomAttribute
            motion:attributeName="backgroundColor"
            motion:customColorValue="#argb"/>
    </Constraint>
一个 <CustomAttribute>包含两个属性:
motion:attributeName是必需属性,并且必须与具有getter和setter方法的对象匹配。getter和setter与特定模式非常匹配。例如,backgroundColor受支持,因为视图具有基本的getBackgroundColor()和setBackgroundColor()方法。- 必须提供的另一个属性基于值类型。从以下支持的类型中选择:
motion:customColorValue适用于颜色motion:customIntegerValue适用于整数motion:customFloatValue适用于浮点值motion:customStringValue适用于字符串motion:customDimension适用于尺寸motion:customBoolean适用于布尔值
示例:更改基础示例的背景颜色
修改之后的MotionScene
1
2
3
4
5
6
7
8
9
10
11
12
13
14
15
16
17
18
19
20
21
22
23
24
25
26
27
28
29
30
31
32
33
34
35
36
37
38
39
40
41
42
43
44
45
46
<?xml version="1.0" encoding="utf-8"?>
<MotionScene xmlns:android="http://schemas.android.com/apk/res/android"
    xmlns:app="http://schemas.android.com/apk/res-auto">

    <Transition
        app:constraintSetEnd="@id/end"
        app:constraintSetStart="@id/start"
        app:duration="1000">

        <OnSwipe
            app:dragDirection="dragRight"
            app:touchAnchorId="@id/view"
            app:touchAnchorSide="right" />

    </Transition>

    <ConstraintSet android:id="@+id/start">
        <Constraint
            android:id="@id/view"
            android:layout_width="64dp"
            android:layout_height="64dp"
            android:layout_marginStart="8dp"
            app:layout_constraintBottom_toBottomOf="parent"
            app:layout_constraintStart_toStartOf="parent"
            app:layout_constraintTop_toTopOf="parent">
            <CustomAttribute
                app:attributeName="backgroundColor"
                app:customColorValue="@color/colorPrimary" />
        </Constraint>
    </ConstraintSet>

    <ConstraintSet android:id="@+id/end">
        <Constraint
            android:id="@id/view"
            android:layout_width="64dp"
            android:layout_height="64dp"
            android:layout_marginEnd="8dp"
            app:layout_constraintBottom_toBottomOf="parent"
            app:layout_constraintEnd_toEndOf="parent"
            app:layout_constraintTop_toTopOf="parent">
            <CustomAttribute
                app:attributeName="backgroundColor"
                app:customColorValue="@color/colorAccent" />
        </Constraint>
    </ConstraintSet>
</MotionScene>
效果:

MotionLayout的关键帧
指定运动序列过程中视图的位置和属性。默认情况下,运动会从初始状态逐渐进入结束状态;通过使用 <KeyFrameSet>可以构建更复杂的运动。<KeyFrameSet> 包含 <KeyPosition> 或 <KeyAttribute>节点。这些节点中的每个节点都指定目标视图在运动特定点处的位置或属性。MotionLayout 平滑地将视图从起点移至每个中间点,然后移至最终目标位置。
语法:
1
2
3
4
5
6
7
8
 <KeyFrameSet>
        [ <KeyPosition/>... ]
        [ <KeyAttribute/>...]
        [ <KeyCycle/>...]
        [ <KeyTimeCycle/>...]
        [ <KeyTrigger/>...]
 </KeyFrameSet>
关键帧位置[KeyPosition]
改造一下上面的MotionScene:
1
2
3
4
5
6
7
8
9
10
11
12
13
14
15
16
17
18
19
20
21
22
23
24
25
26
27
28
29
30
31
<?xml version="1.0" encoding="utf-8"?>
<MotionScene xmlns:android="http://schemas.android.com/apk/res/android"
    xmlns:app="http://schemas.android.com/apk/res-auto">

    <Transition
        app:constraintSetEnd="@id/end"
        app:constraintSetStart="@id/start"
        app:duration="1000">

        <OnSwipe
            app:dragDirection="dragRight"
            app:touchAnchorId="@id/view"
            app:touchAnchorSide="right" />

        <KeyFrameSet>
            <KeyPosition
                app:framePosition="50"
                app:keyPositionType="pathRelative"
                app:motionTarget="@id/view"
                app:percentY="-0.25" />
        </KeyFrameSet>
    </Transition>

    <ConstraintSet android:id="@+id/start">
        xxx
    </ConstraintSet>

    <ConstraintSet android:id="@+id/end">
        xxx
    </ConstraintSet>
</MotionScene>
KeyPostion包含的属性说明如下:
motion:motionTarget代表操作的视图。motion:framePosition1 到 99,0 = start 100 = end。 之间的整数,用于指定运动序列中视图何时到达此<KeyPosition>指定的点。例如,如果framePosition为 25,则视图在整个运动路径的四分之一处到达指定点。motion:percentX、motion:percentY指定视图应到达的位置。motion:keyPositionTypeparentRelative,percentX和percentY是相对于父视图指定的。X 为横轴,范围从 0(左端)到 1(右端)。Y 为纵轴,其中 0 为顶部,1 为底部。deltaRelative,percentX和percentY是相对于视图在整个运动序列过程中移动的距离指定的。X 为横轴,Y 为纵轴;在这两种情况下,0 为视图在该轴上的起始位置,1 为最终位置。pathRelativeX 轴是目标视图在路径范围内移动的方向,其中 0 为起始位置,1 为最终位置。Y 轴垂直于 X 轴,正值位于路径左侧,负值位于右侧;设置一个非零的 percentY 可使视图向一个方向或另一个方向呈弧形运动。因此,视图的初始位置为 (0,0),最终位置为 (1,0)。
关键帧差值[KeyAttribute]
改造一下上面的MotionScene:
1
2
3
4
5
6
7
8
9
10
11
12
13
14
15
16
17
18
19
20
21
22
23
24
25
26
27
28
29
30
31
32
33
34
35
36
37
<?xml version="1.0" encoding="utf-8"?>
<MotionScene xmlns:android="http://schemas.android.com/apk/res/android"
    xmlns:app="http://schemas.android.com/apk/res-auto">

    <Transition
        app:constraintSetEnd="@id/end"
        app:constraintSetStart="@id/start"
        app:duration="1000">

        <OnSwipe
            app:dragDirection="dragRight"
            app:touchAnchorId="@id/view"
            app:touchAnchorSide="right" />

        <KeyFrameSet>
            <KeyPosition
                app:framePosition="50"
                app:keyPositionType="pathRelative"
                app:motionTarget="@id/view"
                app:percentY="-0.25" />
            <KeyAttribute
                android:rotation="-45"
                android:scaleX="2"
                android:scaleY="2"
                app:framePosition="50"
                app:motionTarget="@id/view" />
        </KeyFrameSet>
    </Transition>

    <ConstraintSet android:id="@+id/start">
        xxx
    </ConstraintSet>

    <ConstraintSet android:id="@+id/end">
        xxx
    </ConstraintSet>
</MotionScene>
KeyAttribute包含的属性说明如下:
motion:motionTarget代表操作的视图。motion:framePosition从 1 到 99 之间的整数,用于指定在运动序列中视图何时具有该<KeyAttribute>指定的属性。例如,如果framePosition为 25,则视图在运动的四分之一处具有指定属性。
其他支持设置属性包括:
android:alphaandroid:elevationandroid:rotationandroid:rotationXandroid:rotationYtransitionPathRotateandroid:scaleXandroid:scaleYandroid:translationXandroid:translationYandroid:translationZ
关键帧周期[KeyCycle]
修改MotionScene:
1
2
3
4
5
6
7
8
9
10
11
12
13
14
15
16
17
18
19
20
21
22
23
24
25
26
27
28
29
30
31
32
33
34
35
36
37
38
39
40
41
42
43
44
45
46
47
48
<?xml version="1.0" encoding="utf-8"?>
<MotionScene xmlns:android="http://schemas.android.com/apk/res/android"
xmlns:app="http://schemas.android.com/apk/res-auto">
<Transition
app:constraintSetEnd="@id/end"
app:constraintSetStart="@id/start"
app:duration="1000">
<OnSwipe
app:dragDirection="dragRight"
app:touchAnchorId="@id/view"
app:touchAnchorSide="right" />
<KeyFrameSet>
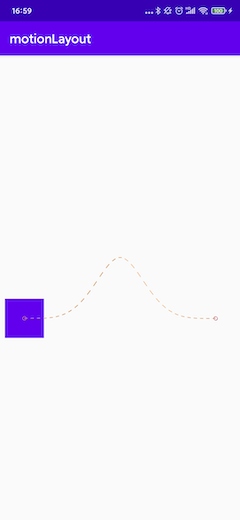
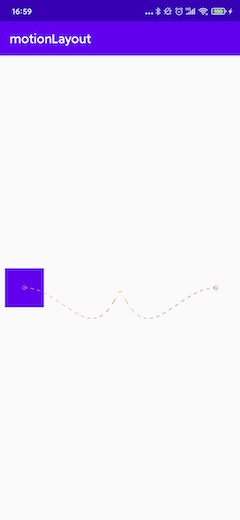
<KeyCycle
android:translationY="50dp"
app:framePosition="100"
app:motionTarget="@id/view"
app:waveOffset="0"
app:wavePeriod="0"
app:waveShape="sin" />
<KeyCycle
android:translationY="50dp"
app:framePosition="50"
app:motionTarget="@id/view"
app:waveOffset="0"
app:wavePeriod="1"
app:waveShape="sin" />
<KeyCycle
android:translationY="50dp"
app:framePosition="0"
app:motionTarget="@id/view"
app:waveOffset="0"
app:wavePeriod="0"
app:waveShape="sin" />
</KeyFrameSet>
</Transition>
<ConstraintSet android:id="@+id/start">
xxx
</ConstraintSet>
<ConstraintSet android:id="@+id/end">
xxx
</ConstraintSet>
</MotionScene>
KeyCycle包含的属性说明如下:
motion:motionTarget代表操作的视图。motion:framePosition从 1 到 99 之间的整数,当前动画处于哪个节点,0 = start 100 = end。motion:waveShape产生的波形(sin、square、triangle、sawtooth、reverseSawtooth、cos、bounce)motion:wavePeriod在该区域循环的次数。motion:waveOffset循环时的偏移量,+代表向下,-代表向上。motion:transitionPathRotate应用于相对于视图行进路径的旋转时的循环。
波形示例:
square
triangle

sawtooth

reverseSawtooth

cos
bounce
关键帧循环周期[KeyTimeCycle]
修改MotionScene:
1
2
3
4
5
6
7
8
9
10
11
12
13
14
15
16
17
18
19
20
21
22
23
24
25
26
27
28
29
30
31
32
33
<?xml version="1.0" encoding="utf-8"?>
<MotionScene xmlns:android="http://schemas.android.com/apk/res/android"
    xmlns:app="http://schemas.android.com/apk/res-auto">

    <Transition
        app:constraintSetEnd="@id/end"
        app:constraintSetStart="@id/start"
        app:duration="1000">

        <OnSwipe
            app:dragDirection="dragRight"
            app:touchAnchorId="@id/view"
            app:touchAnchorSide="right" />

        <KeyFrameSet>
            <KeyTimeCycle
                android:translationY="50dp"
                app:framePosition="0"
                app:motionTarget="@id/view"
                app:waveOffset="0"
                app:wavePeriod="1"
                app:waveShape="sin" />
        </KeyFrameSet>
    </Transition>

    <ConstraintSet android:id="@+id/start">
       xxx
    </ConstraintSet>

    <ConstraintSet android:id="@+id/end">
        xxx
    </ConstraintSet>
</MotionScene>
KeyTimeCycle包含的属性说明如下:
motion:motionTarget代表操作的视图。motion:framePosition从 1 到 99 之间的整数,当前动画处于哪个节点,0 = start 100 = end。motion:waveShape产生的波形(sin、square、triangle、sawtooth、reverseSawtooth、cos、bounce)motion:wavePeriod每秒循环的次数。motion:waveOffset循环时的偏移量,+代表向下,-代表向上。motion:transitionPathRotate应用于相对于视图行进路径的旋转时的循环。
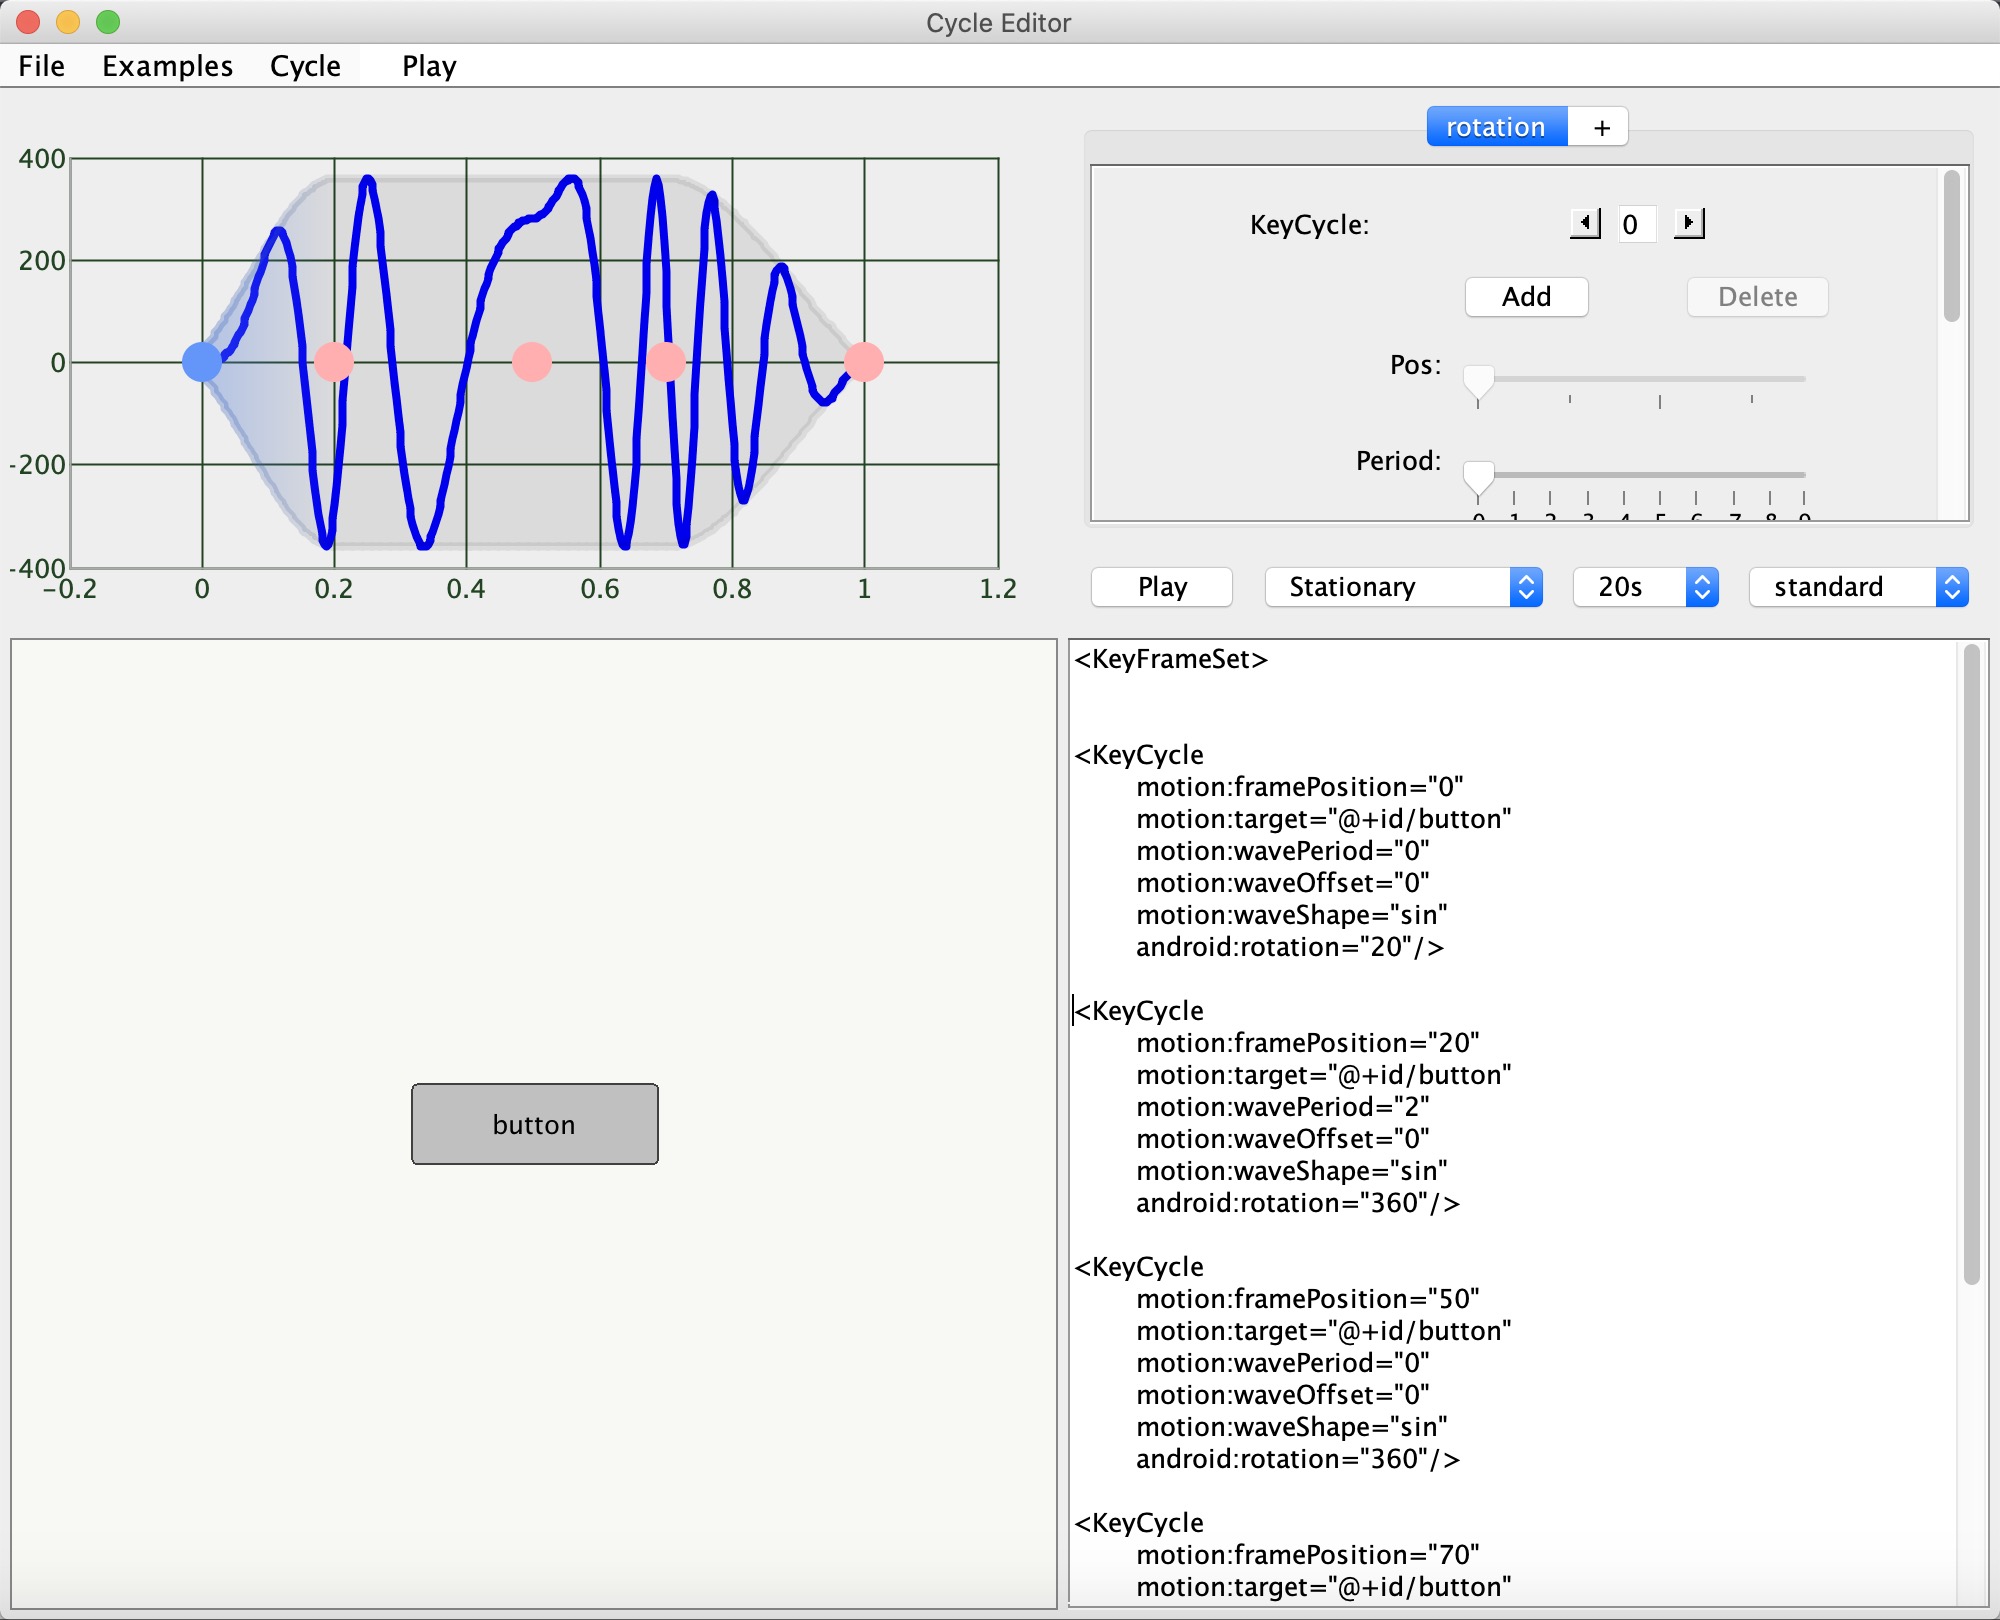
Google也推出了用于可视化编辑KeyCycle,CyclerEditor,点击下载。
执行
java -jar CycleEditor.jar
关键帧触发器[KeyTrigger]
修改布局。
1
2
3
4
5
6
7
8
9
10
11
12
13
14
15
16
17
18
19
20
21
22
23
24
25
26
<?xml version="1.0" encoding="utf-8"?>
<androidx.constraintlayout.motion.widget.MotionLayout xmlns:android="http://schemas.android.com/apk/res/android"
    xmlns:app="http://schemas.android.com/apk/res-auto"
    xmlns:tools="http://schemas.android.com/tools"
    android:layout_width="match_parent"
    android:layout_height="match_parent"
    app:layoutDescription="@xml/scene_basic"
    app:showPaths="true"
    tools:context=".MainActivity">

    <View
        android:id="@+id/view"
        android:layout_width="64dp"
        android:layout_height="64dp"
        android:background="@color/colorPrimary" />

    <com.google.android.material.floatingactionbutton.FloatingActionButton
        android:id="@+id/fab"
        android:layout_width="wrap_content"
        android:layout_height="wrap_content"
        android:layout_margin="16dp"
        android:src="@drawable/ic_add"
        app:layout_constraintBottom_toBottomOf="parent"
        app:layout_constraintEnd_toEndOf="parent" />

</androidx.constraintlayout.motion.widget.MotionLayout>
修改MotionScene
1
2
3
4
5
6
7
8
9
10
11
12
13
14
15
16
17
18
19
20
21
22
23
24
25
26
27
28
29
30
31
32
33
<?xml version="1.0" encoding="utf-8"?>
<MotionScene xmlns:android="http://schemas.android.com/apk/res/android"
    xmlns:app="http://schemas.android.com/apk/res-auto">

    <Transition
        app:constraintSetEnd="@id/end"
        app:constraintSetStart="@id/start"
        app:duration="1000">

        <OnSwipe
            app:dragDirection="dragRight"
            app:touchAnchorId="@id/view"
            app:touchAnchorSide="right" />

        <KeyFrameSet>

            <KeyTrigger
                app:framePosition="10"
                app:motionTarget="@id/fab"
                app:onCross="hide" />

        </KeyFrameSet>

    </Transition>

    <ConstraintSet android:id="@+id/start">
       xxx
    </ConstraintSet>

    <ConstraintSet android:id="@+id/end">
       xxx
    </ConstraintSet>
</MotionScene>
如果想要同时实现FloatingActionButton的显示隐藏,修改一下MotionScene。
1
2
3
4
5
6
7
8
9
10
11
12
13
14
15
16
17
18
19
20
21
22
23
24
25
26
27
28
29
30
31
32
33
34
35
36
37
38
<?xml version="1.0" encoding="utf-8"?>
<MotionScene xmlns:android="http://schemas.android.com/apk/res/android"
    xmlns:app="http://schemas.android.com/apk/res-auto">

    <Transition
        app:constraintSetEnd="@id/end"
        app:constraintSetStart="@id/start"
        app:duration="1000">

        <OnSwipe
            app:dragDirection="dragRight"
            app:touchAnchorId="@id/view"
            app:touchAnchorSide="right" />

        <KeyFrameSet>

            <KeyTrigger
                app:framePosition="10"
                app:motionTarget="@id/fab"
                app:onPositiveCross="hide" />

            <KeyTrigger
                app:framePosition="20"
                app:motionTarget="@id/fab"
                app:onNegativeCross="show" />

        </KeyFrameSet>

    </Transition>

    <ConstraintSet android:id="@+id/start">
        xxx
    </ConstraintSet>

    <ConstraintSet android:id="@+id/end">
        xxx
    </ConstraintSet>
</MotionScene>

KeyTrigger包含的属性说明如下:
motion:motionTarget代表操作的视图。motion:framePosition从 1 到 99 之间的整数,当前动画处于哪个节点,0 = start 100 = end。motion:onCross(方法名)移动位置到framePosition时触发。motion:onPositiveCross(方法名)正向移动位置到framePosition时触发。motion:onNegativeCross(方法名)反向移动位置到framePosition时触发。motion:triggerSlackmotion:triggerIdmotion:motion_postLayoutCollisionmotion:motion_triggerOnCollision
状态监听
监听Transition:
setTransitionListener(object : MotionLayout.TransitionListener {
            override fun onTransitionStarted(
                motionLayout: MotionLayout?,
                startId: Int,
                endId: Int
            ) {
                //Called when a drawer is about to start a transition.
            }

            override fun onTransitionChange(
                motionLayout: MotionLayout?,
                startId: Int,
                endId: Int,
                progress: Float
            ) {
                //Called when a drawer's position changes.
            }

            override fun onTransitionCompleted(motionLayout: MotionLayout?, currentId: Int) {
                //Called when a drawer has settled completely a state.
            }

            override fun onTransitionTrigger(
                motionLayout: MotionLayout?,
                triggerId: Int,
                positive: Boolean,
                progress: Float
            ) {
                //Call when a trigger is fired
            }
        })
手动调整到start、end:
transitionToStart()
transitionToEnd()
综合实例
效果一
效果图:

1
2
3
4
5
6
7
8
9
10
11
12
13
14
15
16
17
18
19
20
21
22
23
24
25
26
27
28
<?xml version="1.0" encoding="utf-8"?>
<androidx.constraintlayout.motion.widget.MotionLayout xmlns:android="http://schemas.android.com/apk/res/android"
    xmlns:app="http://schemas.android.com/apk/res-auto"
    xmlns:tools="http://schemas.android.com/tools"
    android:layout_width="match_parent"
    android:layout_height="match_parent"
    app:layoutDescription="@xml/activity_combine_scene"
    app:showPaths="false"
    tools:context=".CombineActivity">

    <com.google.android.material.floatingactionbutton.FloatingActionButton
        android:id="@+id/fab_main"
        android:layout_width="wrap_content"
        android:layout_height="wrap_content"
        android:src="@drawable/ic_add"
        app:layout_constraintBottom_toBottomOf="parent"
        app:layout_constraintEnd_toEndOf="parent" />

    <androidx.cardview.widget.CardView
        android:id="@+id/card_main"
        android:layout_width="0dp"
        android:layout_height="0dp"
        app:cardBackgroundColor="@color/colorAccent"
        app:cardCornerRadius="16dp"
        app:layout_constraintBottom_toBottomOf="parent"
        app:layout_constraintEnd_toEndOf="parent"
        app:layout_constraintStart_toStartOf="parent" />
</androidx.constraintlayout.motion.widget.MotionLayout>
MotionScene:
1
2
3
4
5
6
7
8
9
10
11
12
13
14
15
16
17
18
19
20
21
22
23
24
25
26
27
28
29
30
31
32
33
34
35
36
37
38
39
40
41
42
43
44
45
46
47
48
49
50
51
52
53
54
55
56
57
58
59
60
61
62
63
<?xml version="1.0" encoding="utf-8"?>
<MotionScene xmlns:android="http://schemas.android.com/apk/res/android"
    xmlns:app="http://schemas.android.com/apk/res-auto">

    <ConstraintSet android:id="@+id/start">
        <Constraint
            android:id="@id/fab_main"
            android:layout_width="wrap_content"
            android:layout_height="wrap_content"
            android:layout_marginEnd="16dp"
            android:layout_marginBottom="16dp"
            android:src="@drawable/ic_add"
            app:layout_constraintBottom_toBottomOf="parent"
            app:layout_constraintEnd_toEndOf="parent" />

        <Constraint
            android:id="@id/card_main"
            android:layout_width="0dp"
            android:layout_height="0dp"
            app:layout_constraintBottom_toBottomOf="parent"
            app:layout_constraintEnd_toEndOf="parent"
            app:layout_constraintStart_toStartOf="parent" />
    </ConstraintSet>

    <ConstraintSet android:id="@+id/end">
        <Constraint
            android:id="@id/fab_main"
            android:layout_width="wrap_content"
            android:layout_height="wrap_content"
            android:layout_marginBottom="8dp"
            android:src="@drawable/ic_add"
            app:layout_constraintBottom_toTopOf="@id/card_main"
            app:layout_constraintEnd_toEndOf="@id/card_main"
            app:layout_constraintStart_toStartOf="@id/card_main">
            <Transform android:rotation="45" />
        </Constraint>

        <Constraint
            android:id="@id/card_main"
            android:layout_width="0dp"
            android:layout_height="300dp"
            app:layout_constraintBottom_toBottomOf="parent"
            app:layout_constraintEnd_toEndOf="parent"
            app:layout_constraintStart_toStartOf="parent" />
    </ConstraintSet>

    <Transition
        app:constraintSetEnd="@id/end"
        app:constraintSetStart="@+id/start">
        <OnClick
            app:clickAction="toggle"
            app:targetId="@id/fab_main" />

        <KeyFrameSet>
            <KeyPosition
                app:framePosition="50"
                app:keyPositionType="pathRelative"
                app:motionTarget="@id/fab_main"
                app:percentY="-0.2" />
        </KeyFrameSet>
    </Transition>
</MotionScene>