Paging简介
Paging是Google推出用于更适用于Android平台的分页库, 数据源可以来自网络或者本地,利用Paging可以使应用更加高效的利用网络带宽和系统资源。
对比传统的分页实现,Google为何单独推出一个Paging用于处理分页呢? Paging的内部实现有一套非常合理的分页架构,我们按照提供架构实现自己的业务逻辑即可,至于什么时候加载、加载状态,都由Paging处理好了。
在Google推出Paging1.0版本的时候,相比其他Jetpack组件,Paging实在是难以提起兴趣去学习,主要是自己在项目中实现了一套完整的分页逻辑,已经能满足日常的开发使用了,再在后面学习到Kotlin Coroutine、Flow的时候再回头看看Paging,好家伙,已经3.0版本了,看样子Paging应该不是Google的一个“试验品”了。
开始操作
首先添加必要的依赖库:
1
2
3
4
implementation "androidx.paging:paging-runtime:3.0.0"
implementation "com.squareup.retrofit2:retrofit:2.9.0"
implementation "com.squareup.retrofit2:converter-gson:2.9.0"
implementation "androidx.fragment:fragment-ktx:1.2.1"
本次Demo采用Retrofit作为网络请求库,此外fragment-ktx是为了使用拓展函数。
1
2
3
ComponentActivity.viewModels(
    noinline factoryProducer: (() -> Factory)? = null
)
本次Demo使用了一个简单的MVVM架构。
网络接口采用了Gank.io提供的Android文章分类列表接口。
https://gank.io/api/v2/data/category/GanHuo/type/Android/page/1/count/10
该接口会返回Android分类下的文章列表,页码跟页面返回条数都能通过参数控制。
服务器返回应答精简如下:
1
2
3
4
5
6
7
8
9
10
11
12
{
    "data":[
        {
            "_id":"5f13da48808d6d2fe6b56f41",
            "title":"Synchly"
        }
    ],
    "page":1,
    "page_count":246,
    "status":100,
    "total_counts":2460
}
准备网络请求,代码如下:
1
2
3
4
5
6
7
8
9
10
11
12
13

data class Response<out T>(
    val page: Int,
    @SerializedName("page_count") val pageCount: Int,
    @SerializedName("total_counts") val totalCount: Int,
    val status: Int,
    val data: T
)

data class Article(
    @SerializedName("_id") val id: String,
    val title: String
)
准备ArticleService用于网络请求:
1
2
3
4
5
6
7
8
9
10
11
12
13
14
15
16
17
18
19
20
interface ArticleService {

    @GET("/api/v2/data/category/GanHuo/type/Android/page/{page}/count/{pageCount}")
    suspend fun getArticles(
        @Path("page") page: Int,
        @Path("pageCount") pageCount: Int
    ): Response<List<Article>>

    companion object {
        private const val BASE_URL = "https://gank.io"

        fun create(): ArticleService {
            return Retrofit.Builder()
                .baseUrl(BASE_URL)
                .addConverterFactory(GsonConverterFactory.create())
                .build()
                .create(ArticleService::class.java)
        }
    }
}
至此网络请求相关的接口准备完毕,接下来准备Paging3实现分页功能。
Paging3的核心组件是PagingSource,只需继承它,然后按部就班的实现分页逻辑即可。
新建ArticlePagingSource继承PagingSource:
1
2
3
4
5
6
7
8
9
10
11
12
13
14
15
16
17
18
19
20
class ArticlePagingSource(private val articleService: ArticleService) : PagingSource<Int, Article>() {

    override fun getRefreshKey(state: PagingState<Int, Article>): Int? {
        return null
    }

    override suspend fun load(params: LoadParams<Int>): LoadResult<Int, Article> {
        return try {
            val page = params.key ?: 1
            val pageSize = params.loadSize
            val articleResponse = articleService.getArticles(page, pageSize)
            val articles = articleResponse.data
            val prevKey = if (page > 1) page - 1 else null
            val nextKey = if (articles.isNotEmpty()) page + 1 else null
            LoadResult.Page(articles, prevKey, nextKey)
        } catch (e: Exception) {
            LoadResult.Error(e)
        }
    }
}
继承PagingSource的时候申明了2个范型类型,第一个类型表示页码的数据类型,一般是Int,本次演示的Demo也是Int,第二个类型表示每一项数据的数据类型,这里代表需要展示的Article。
在load()函数中,通过params.key获取到当前的页码,可能是null,如果是null的时候将其设置为第一页,通过params.loadSize可以获取到每页包含的数据量。
再通过articleService.getArticles(page, pageSize)从服务器获取数据。
最后通过LoadResult.Page()函数构建LoadResult对象返回,第一个参数代表数据源,第二个代表上一页页码,第三个函数代表下一页的页码。
至于getRefreshKey()函数,这个属于高阶用法,可以允许Paging从某个位置开始加载,要配合该函数使用的时候需要将PagingSource的jumpingSupported设置为true,并且在PagingConfig设置jumpThreshold,有机会的话整理一篇Paging的高级用法会记录到该内容。一般情况下直接返回null即可。
准备Repository:
1
2
3
4
5
6
7
8
9
10
11
12
13
14
15
16
17
18
19
20
21
22
class ArticleRepository private constructor() {

    companion object {
        private const val PAGE_SIZE = 10

        @Volatile
        private var instance: ArticleRepository? = null

        fun getInstance() = instance ?: synchronized(this) {
            instance ?: ArticleRepository().also {
                instance = it
            }
        }
    }

    fun getArticles(): Flow<PagingData<Article>> {
        return Pager(
            config = PagingConfig(PAGE_SIZE),
            pagingSourceFactory = { ArticlePagingSource(ArticleService.create()) }
        ).flow
    }
}
在代码中配置PAGE_SIZE,指定了pagingSourceFactory。
接下来准备ViewModel:
1
2
3
4
5
6
7
class ArticleViewModel(private val repository: ArticleRepository) : ViewModel() {

    fun getPagingData(): Flow<PagingData<Article>> {
        return repository.getArticles().cachedIn(viewModelScope)
    }

}
这个cachedIn函数可以将服务器返回的数据在viewModelScope作用域内缓存,如果手机旋转之类的数据可以直接读取缓存中的数据,不必重新发起请求。
准备ViewModelFactory和ViewModelFactoryProvider:
1
2
3
4
5
6
7
8
9
10
11
12
class ArticleViewModelFactory(private val repository: ArticleRepository) :
    ViewModelProvider.NewInstanceFactory() {
    override fun <T : ViewModel?> create(modelClass: Class<T>): T {
        return ArticleViewModel(repository) as T
    }
}

object ViewModelProvider {
    fun provideArticleViewModelFactory(): ArticleViewModelFactory {
        return ArticleViewModelFactory(ArticleRepository.getInstance())
    }
}
至此数据逻辑已经全部完毕,接下来准备页面相关代码, Paging3会跟RecyclerView配合使用,新建item_article,代码如下:
1
2
3
4
5
6
7
8
9
10
11
<?xml version="1.0" encoding="utf-8"?>
<TextView xmlns:android="http://schemas.android.com/apk/res/android"
    android:id="@+id/tv_article_title"
    android:layout_width="match_parent"
    android:layout_height="wrap_content"
    android:gravity="center_vertical"
    android:textColor="@color/black"
    android:maxLines="2"
    android:ellipsize="end"
    android:padding="8dp"
    android:textSize="18sp" />
准备RecyclerView的Adapter,Paging要求Adapter必须继承PagingDataAdapter,如下:
1
2
3
4
5
6
7
8
9
10
11
12
13
14
15
16
17
18
19
20
21
22
23
24
25
26
27
class ArticleAdapter : PagingDataAdapter<Article, ArticleAdapter.ViewHolder>(COMPARATOR) {
    companion object {
        private val COMPARATOR = object : DiffUtil.ItemCallback<Article>() {
            override fun areItemsTheSame(oldItem: Article, newItem: Article): Boolean {
                return oldItem.id == newItem.id
            }

            override fun areContentsTheSame(oldItem: Article, newItem: Article): Boolean {
                return oldItem == newItem
            }
        }
    }

    override fun onBindViewHolder(holder: ViewHolder, position: Int) {
        holder.articleTv.text = getItem(position)?.title ?: "UNKNOWN TITLE"
    }

    override fun onCreateViewHolder(parent: ViewGroup, viewType: Int): ViewHolder {
        return ViewHolder(
            LayoutInflater.from(parent.context).inflate(R.layout.item_article, parent, false)
        )
    }

    class ViewHolder(itemView: View) : RecyclerView.ViewHolder(itemView) {
        val articleTv: TextView = itemView.findViewById(R.id.tv_article_title)
    }
}
其实跟常用的ListAdapter类似,需要提供一个DiffUtil.ItemCallback,因为Paging3的内部也是使用DiffUtil管理数据变化。
最后准备集成到Activity中,修改activity_main.xml,定义RecyclerView和ProgressBar:
1
2
3
4
5
6
7
8
9
10
11
12
13
14
15
16
17
18
19
20
<?xml version="1.0" encoding="utf-8"?>
<FrameLayout xmlns:android="http://schemas.android.com/apk/res/android"
    xmlns:app="http://schemas.android.com/apk/res-auto"
    xmlns:tools="http://schemas.android.com/tools"
    android:layout_width="match_parent"
    android:layout_height="match_parent"
    tools:context=".MainActivity">

    <androidx.recyclerview.widget.RecyclerView
        android:id="@+id/rv_articles"
        android:layout_width="match_parent"
        android:layout_height="match_parent"
        app:layoutManager="androidx.recyclerview.widget.LinearLayoutManager" />

    <ProgressBar
        android:id="@+id/pb_main"
        android:layout_width="45dp"
        android:layout_height="45dp"
        android:layout_gravity="center" />
</FrameLayout>
修改MainActivity的代码,如下:
1
2
3
4
5
6
7
8
9
10
11
12
13
14
15
16
17
18
19
20
21
22
23
24
25
26
27
28
29
30
31
32
33
34
35
36
37
38
39
40
41
42
43
44
45
46
47
48
49
50
class MainActivity : AppCompatActivity() {

    private val mArticleAdapter by lazy {
        ArticleAdapter()
    }

    private val mArticleViewModel: ArticleViewModel by viewModels {
        ViewModelProvider.provideArticleViewModelFactory()
    }

    override fun onCreate(savedInstanceState: Bundle?) {
        super.onCreate(savedInstanceState)
        setContentView(R.layout.activity_main)
        val loadPb: ProgressBar = findViewById(R.id.pb_main)
        val articlesRv: RecyclerView = findViewById(R.id.rv_articles)

        articlesRv.apply {
            addItemDecoration(
                DividerItemDecoration(
                    this@MainActivity,
                    DividerItemDecoration.VERTICAL
                )
            )
            adapter = mArticleAdapter
        }

        mArticleAdapter.addLoadStateListener { state ->
            when (state.refresh) {
                is LoadState.NotLoading -> {
                    loadPb.visibility = View.INVISIBLE
                    articlesRv.visibility = View.VISIBLE
                }
                is LoadState.Loading -> {
                    loadPb.visibility = View.VISIBLE
                    articlesRv.visibility = View.INVISIBLE
                }
                is LoadState.Error -> {
                    loadPb.visibility = View.INVISIBLE
                    val errorState = state.refresh as LoadState.Error
                    //TODO Handle error
                }
            }
        }
        lifecycleScope.launch {
            mArticleViewModel.getPagingData().collect {
                mArticleAdapter.submitData(it)
            }
        }
    }
}
在调用了ArticleAdapter的submitData()函数之后,Paging3就开始工作了。
在AndroidManifest.xml文件中添加网络权限:
1
2
3
4
5
6
7
8
<?xml version="1.0" encoding="utf-8"?>
<manifest xmlns:android="http://schemas.android.com/apk/res/android"
    package="com.qfxl.sample">

    <uses-permission android:name="android.permission.INTERNET" />
    ...

</manifest>
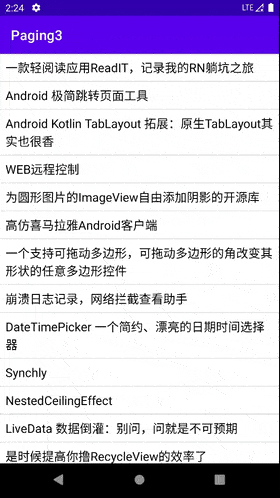
运行之:
可以看到,当不停往下滑动的时候Paging3会自动加载更多数据,仿佛永远滑不到头一样。
显示加载状态
根据Paging3的设计,理论上不应该在底部显示加载状态,因为Paging3会在列表还没滑到底部的时候自动加载下一页数据。
但是如果网络不好,虽然Paging3会提前加载下一页的数据,但是当滑动到底部的时候,可能服务器还没有响应完成,这个时候应该在底部显示一个loading状态。
另外如果数据加载失败,此时在列表底部给用户提供一个重新加载的操作会显得更加友好。
接下来实现该功能。
新建layout_paging_state_footer.xml布局,用户展示加载进度跟加载失败布局:
1
2
3
4
5
6
7
8
9
10
11
12
13
14
15
16
17
18
19
<?xml version="1.0" encoding="utf-8"?>
<FrameLayout xmlns:android="http://schemas.android.com/apk/res/android"
    android:layout_width="match_parent"
    android:layout_height="40dp">
    <ProgressBar
        android:id="@+id/pb_paging_state_loading"
        android:layout_width="40dp"
        android:layout_height="40dp"
        android:layout_gravity="center" />

    <TextView
        android:id="@+id/tv_paging_state_result"
        android:layout_width="match_parent"
        android:layout_height="match_parent"
        android:gravity="center"
        android:text="加载失败,点我重试~"
        android:textColor="#666666"
        android:textSize="16sp" />
</FrameLayout>
创建PagingLoadStateFooterAdapter作为RecyclerView底部适配器,必须继承自LoadStateAdapter,如下:
1
2
3
4
5
6
7
8
9
10
11
12
13
14
15
16
17
18
19
20
21
22
23
24
25
26
27
class PagingLoadStateFooterAdapter(private val retryAction: () -> Unit) :
    LoadStateAdapter<PagingLoadStateFooterAdapter.ViewHolder>() {

    class ViewHolder(itemView: View) : RecyclerView.ViewHolder(itemView) {
        val pagingLoadPb: ProgressBar = itemView.findViewById(R.id.pb_paging_state_loading)
        val pagingResult: TextView = itemView.findViewById(R.id.tv_paging_state_result)
    }

    override fun onBindViewHolder(holder: ViewHolder, loadState: LoadState) {
        holder.apply {
            pagingLoadPb.isVisible = loadState is LoadState.Loading
            pagingResult.apply {
                isVisible = loadState is LoadState.Error
                setOnClickListener {
                    retryAction()
                }
            }
        }
    }

    override fun onCreateViewHolder(parent: ViewGroup, loadState: LoadState): ViewHolder {
        return ViewHolder(
            LayoutInflater.from(parent.context)
                .inflate(R.layout.layout_paging_state_footer, parent, false)
        )
    }
}
只需要在onBindViewHolder()中根据回调的LoadState状态来决定底部显示的状态。
最后修改MainActivity,将PagingLoadStateFooterAdapter集成到ArticleAdapter中:
1
2
3
4
5
6
7
8
9
10
11
12
13
14
15
16
17
class MainActivity : AppCompatActivity() {
    override fun onCreate(savedInstanceState: Bundle?) {
        xxx
        articlesRv.apply {
            addItemDecoration(
                DividerItemDecoration(
                    this@MainActivity,
                    DividerItemDecoration.VERTICAL
                )
            )
            adapter = mArticleAdapter.withLoadStateFooter(PagingLoadStateFooterAdapter{
                mArticleAdapter.retry()
            })
        }
        xxx
    }
}
其实也是通过ConcatAdapter将ArticleAdapter跟PagingLoadStateFooterAdapter关联起来。
运行:
结论
本文Paging3入门到这里结束,如果想了解Paging3的高阶用法,可以参考Google的Codelab项目:
https://developer.android.com/codelabs/android-paging