前言
本文的由来是群里有好几个群友在咨询关于RecyclerView侧滑菜单的功能,虽然在Github上有很多案例,但是对于实现一个带侧滑功能的Layout没有很好的说明,于是决定写这篇博客来记录一下一个侧滑的Layout怎么实现。
本文涉及到的内容:
- ViewDragHelper
- 自定义ViewGroup
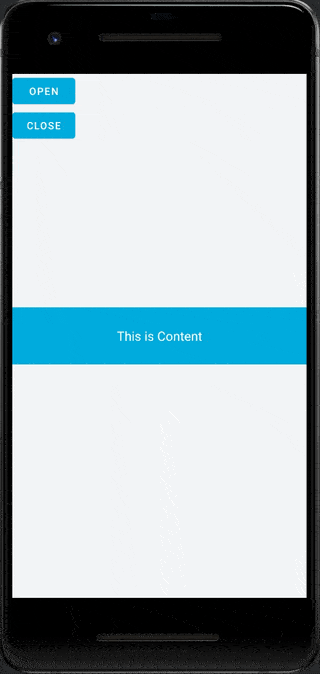
效果图
实现流程
首先这种效果是侧滑菜单放在内容View下方,然后允许内容View向左滑动。本来一开始是想用ViewGroup来实现,但是ViewGroup要自己测量、布局、实现touch算法反而会劝退提问的群友们,所以这次使用更加简单的方法。
继承FrameLayout,使用ViewDragHelper。继承FrameLayout能省去测量跟布局的计算,使用ViewDragHelper能省去触摸算法计算。
简单介绍一下ViewDragHelper。
初始化一个ViewDragHelper代码如下:
1
val mViewDragHelper = ViewDragHelper.create(context, 1.0f, ViewDragHelper.Callback)
触摸回调在ViewDragHelper.Callback里:
1
2
3
4
5
6
7
8
9
10
11
12
13
14
15
16
17
 private val mDragCallback: ViewDragHelper.Callback = object : ViewDragHelper.Callback() {
        override fun tryCaptureView(child: View, pointerId: Int): Boolean {

        }

        override fun clampViewPositionHorizontal(child: View, left: Int, dx: Int): Int {

        }

        override fun onViewReleased(releasedChild: View, xvel: Float, yvel: Float) {

        }

        override fun getViewHorizontalDragRange(child: View): Int {

        }
    }
以上为效果图里需要实现的方法,依次解释:
1
2
3
 override fun tryCaptureView(child: View, pointerId: Int): Boolean {
    return whichViewCaptured
}
该方法表示当用户手势捕捉到之后,应该是哪个View被处理,如果该View要处理用户手势则return true,如果该View成果捕捉到手势则顺应会回调到
onViewCaptured(View, Int),当然本文不需要这个回调。
1
2
3
 override fun clampViewPositionHorizontal(child: View, left: Int, dx: Int): Int {
    return 0
}
该方法会限制被拖动View水平方向运动坐标,其中left参数代表被拖动View的left坐标。比如限制最大left只能是300,则直接return min(left, 300)即可,那该View最大只能滑动到left=300的位置,当超过300的时候会被“修正”为300。
1
2
3
 override fun onViewReleased(releasedChild: View, xvel: Float, yvel: Float) {

}
该方法顾名思义,就是View拖动释放时的回调,一般在这里做一些缺省操作,比如拖到某个距离触发某些阀值。主要需要对参数做说明:
- releasedChild - 被释放的View
- xvel - 水平上的加速度
- yvel - 垂直方向的加速度
1
2
3
 override fun getViewHorizontalDragRange(child: View): Int {
    return range
}
该方法表示水平运动范围,如果某些View不允许拖动直接返回0即可。
使用ViewDragHelper接管Touch算法。
1
2
3
4
5
6
7
8
override fun onInterceptTouchEvent(ev: MotionEvent): Boolean {
    return mDragHelper.shouldInterceptTouchEvent(ev)
}

override fun onTouchEvent(event: MotionEvent): Boolean {
    mDragHelper.processTouchEvent(event)
        return true
}
完整实现
1
2
3
4
5
6
7
8
9
10
11
12
13
14
15
16
17
18
19
20
21
22
23
24
25
26
27
28
29
30
31
32
33
34
35
36
37
38
39
40
41
42
43
44
45
46
47
48
49
50
51
52
53
54
55
56
57
58
59
60
61
62
63
64
65
66
67
68
69
70
71
72
73
74
75
76
77
78
79
80
81
82
83
84
85
86
87
88
89
90
91
92
93
94
95
96
class SwipeMenuLayout @JvmOverloads constructor(
    context: Context,
    attrs: AttributeSet? = null,
    defStyle: Int = 0
) : FrameLayout(context, attrs, defStyle) {

    private lateinit var menuView: View

    private lateinit var contentView: View

    private lateinit var mDragHelper: ViewDragHelper

    private val mDragCallback: ViewDragHelper.Callback = object : ViewDragHelper.Callback() {
        override fun tryCaptureView(child: View, pointerId: Int): Boolean {
            return child == contentView
        }

        override fun clampViewPositionHorizontal(child: View, left: Int, dx: Int): Int {
            return min(0, max(-menuView.width, left))
        }

        override fun onViewReleased(releasedChild: View, xvel: Float, yvel: Float) {
            val contentViewMovedOffset =
                (releasedChild.width - releasedChild.right).toFloat() / menuView.width.toFloat()

            val finalLeft =
                if (contentViewMovedOffset >= 0.5f) {
                    -menuView.width
                } else {
                    0
                }
            mDragHelper.settleCapturedViewAt(finalLeft, releasedChild.top)
            invalidate()
        }

        override fun getViewHorizontalDragRange(child: View): Int {
            return if (child == contentView) menuView.width else 0
        }
    }

    init {
        mDragHelper = ViewDragHelper.create(this, 1.0f, mDragCallback)
    }

    override fun computeScroll() {
        if (mDragHelper.continueSettling(true)) {
            invalidate()
        }
    }

    override fun onInterceptTouchEvent(ev: MotionEvent): Boolean {
        return mDragHelper.shouldInterceptTouchEvent(ev)
    }

    override fun onTouchEvent(event: MotionEvent): Boolean {
        mDragHelper.processTouchEvent(event)
        return true
    }

    override fun onFinishInflate() {
        super.onFinishInflate()
        if (childCount != 2) {
            throw RuntimeException("SwipeMenuLayout must have 2 child view only.")
        }
        menuView = getChildAt(0)
        contentView = getChildAt(1)
        menuView.setOnClickListener {
            Toast.makeText(context, "delete", Toast.LENGTH_SHORT).show()
        }
    }

    fun openMenu() {
        mDragHelper.smoothSlideViewTo(contentView, -menuView.width, contentView.top)
        invalidate()
    }

    fun closeMenu() {
        mDragHelper.smoothSlideViewTo(contentView, 0, contentView.top)
        invalidate()
    }

    override fun onLayout(changed: Boolean, left: Int, top: Int, right: Int, bottom: Int) {
        contentView.layout(
            0,
            0,
            measuredWidth,
            contentView.measuredHeight
        )
        menuView.layout(
            measuredWidth - menuView.measuredWidth,
            0,
            measuredWidth,
            menuView.measuredHeight
        )
    }
}
这里重写了onLayout,目的是将MenuView放到右侧。
至此一个简单的侧滑布局就完成。
完整布局
1
2
3
4
5
6
7
8
9
10
11
12
13
14
15
16
17
18
19
20
21
22
23
24
25
26
27
28
29
30
31
32
33
34
35
36
37
38
39
40
41
42
43
44
45
46
47
48
49
<RelativeLayout
            xmlns:android="http://schemas.android.com/apk/res/android"
            android:layout_width="match_parent"
            android:layout_height="match_parent">

        <com.zby.base.ui.layout.SwipeMenuLayout
                android:id="@+id/menu_layout"
                android:layout_width="match_parent"
                android:layout_height="80dp"
                android:layout_centerInParent="true">

            <TextView
                    android:layout_width="80dp"
                    android:layout_height="match_parent"
                    android:background="@color/colorAccent"
                    android:gravity="center"
                    android:text="删除"
                    android:textColor="@color/colorWhite"
                    android:textSize="16sp" />

            <TextView
                    android:layout_width="match_parent"
                    android:layout_height="match_parent"
                    android:background="@color/colorPrimary"
                    android:gravity="center"
                    android:text="This is Content"
                    android:textColor="@color/colorWhite"
                    android:textSize="18sp" />

        </com.zby.base.ui.layout.SwipeMenuLayout>

        <LinearLayout
                android:layout_width="match_parent"
                android:layout_height="wrap_content"
                android:orientation="vertical">

            <Button
                    android:id="@+id/btn_open"
                    android:layout_width="wrap_content"
                    android:layout_height="wrap_content"
                    android:text="open" />

            <Button
                    android:id="@+id/btn_close"
                    android:layout_width="wrap_content"
                    android:layout_height="wrap_content"
                    android:text="close" />
        </LinearLayout>
    </RelativeLayout>
题外
有的群友说他们产品要的需求是侧滑菜单跟在内容View之后,不是在内容View下面,其实在我这博客大部分逻辑都提供了,稍微改造一下应该就能实现该效果。

需要改造的是onLayout的时候将菜单布局到内容View的后面,然后内容View移动的时候将菜单View的translationX同步更新即可。
onLayout:
1
2
3
4
5
6
7
8
9
10
11
12
13
14
  override fun onLayout(changed: Boolean, left: Int, top: Int, right: Int, bottom: Int) {
        contentView.layout(
            0,
            0,
            measuredWidth,
            contentView.measuredHeight
        )
        menuView.layout(
            measuredWidth,
            0,
            measuredWidth + menuView.measuredWidth,
            contentView.measuredHeight
        )
    }
其次为了同步内容View跟菜单View,需要在ViewDraHelper.Callback中多实现一个方法。
1
2
3
4
5
6
7
8
9
  override fun onViewPositionChanged(
            changedView: View,
            left: Int,
            top: Int,
            dx: Int,
            dy: Int
        ) {
     menuView.translationX = left.toFloat()
}
这个会在拖拽View位置发生变化的时候回调,在这里同步菜单View的translationX即可。
总结
关于如何在RecyclerView中使用,首先Item的左右滑动的时候屏蔽掉垂直方向的手势,其次就是触发点击事件的时候不影响RecyclerView Item的点击事件,一般情况下在RecyclerView中可能只有一个Item能打开菜单,为了实现这种互斥效果,可以扩展SwipeMenuLayout的状态以及打开关闭的回调,然后在RecyclerView的Adapter中持有Item的SwipeMenuLayout并监听对应的打开关闭状态,当某一个打开的时候触发回调,关闭其他ViewHolder中持有的SwipeMenuLayout的菜单。
实现功能思路很重要,代码只是思路的一种实现,简而易懂的代码才能称之为优雅。