前言
在了解Binder之前,需要对Android的整个架构有个大致了解。
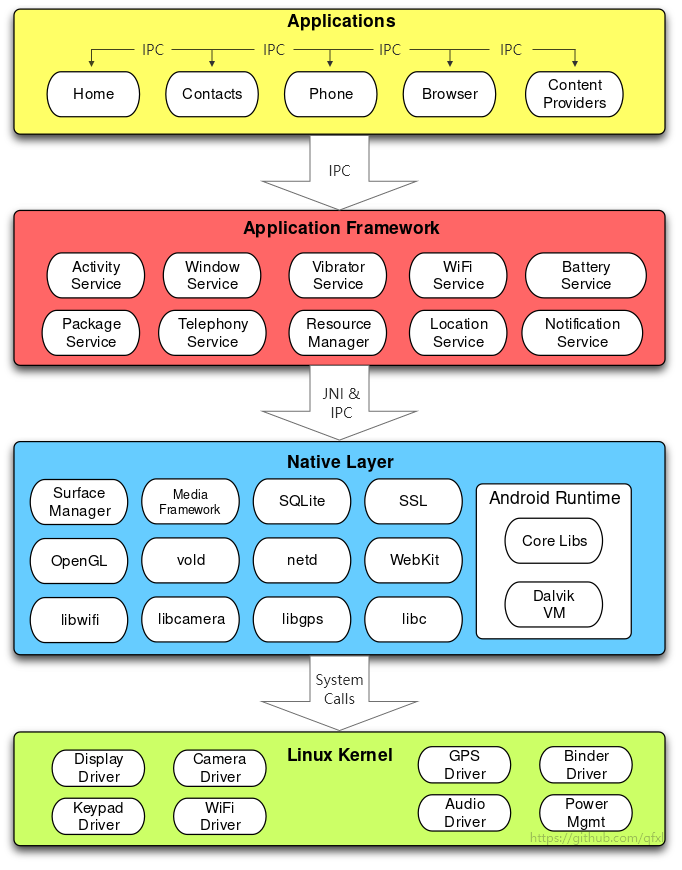
Android开发中Binder是必须了解的知识,但是想要去深入了解其原理其实是一件比较麻烦的事情,涉及到的内容太杂。从Framework到Kernel,处处都在使用Binder。本文不记录源码,篇幅过长,本文记录对于Binder的理解、工作流程以及Binder的使用。
Binder是什么
Binder是使用在Android上的一种跨进程通信机制。 众所周知Android中一个进程不能直接访问另一个进程的内存(进程隔离)。为了解决这种问题,进程与进程之间的通信需要一个桥梁。比如你的应用想要知道现在手机还剩下多少电量,此时就需要使用系统服务PowerManager,这就是一个典型的Binder机制使用。
为什么是Binder?
Linux的IPC实现已经有了共享内存、管道、UDS等机制,为什么Android不采用这些,而是额外实现一个Binder?主要的原因是Binder更高效、更稳定、更安全。
简单对比几种IPC机制的优劣势:
-
共享内存(Shared Memory) 共享内存方式实现进程间通信依靠的是申请一块内存区域,然后将这块内存映射到进程空间中,这样两个进程都可以直接访问这块内存。在进行进程间通信时,两个进程可以利用这块内存空间进行数据交换。通过这样的方式,减少了数据的赋值操作,因此共享内存实现进程间通信在速度上有明显优势。缺点:控制复杂,难以使用。
-
管道(Pipe) 管道也是操作系统中常见的一种进程间通信方式,Windows系统进程间的通信依赖于此种方式实现。在进行进程间通信时,会在两个进程间建立一根拥有读(read)写(write)功能的管道,一个进程写数据,另一个进程可以读取数据,从而实现进程间通信问题。缺点:采用存储-转发方式,即数据先从发送方缓存区拷贝到内核开辟的缓存区中,然后再从内核缓存区拷贝到接收方缓存区,至少有两次拷贝过程。
-
UDS(UNIX Domain Socket) UDS也被称为IPC Socket,但它有别于network 的Socket。UDS的内部实现不依赖于TCP/IP协议,而是基于本机的“安全可靠操作”实现。UDS这种进程间通信方式在Android中用到的也是比较多的。缺点:传输效率低,开销大,主要用在跨网络的进程间通信和本机上进程间的低速通信。
-
Binder Binder是Android中独有的一种进程间通信方式。它底层依靠mmap(Memory Map),只需要一次数据拷贝,把一块物理内存同时映射到内核和目标进程的用户空间。
Binder的优势
相比传统的通信方式Binder在效率、稳定性、安全性上有更高的要求。
- 效率: Binder是仅次于
共享内存,Binder数据需要拷贝一次,而管道、消息队列、Socket都需要2次,但共享内存方式一次内存拷贝都不需要;从性能角度看,Binder性能仅次于共享内存。 - 稳定性: Binder是基于
C/S架构,架构清晰明了。Server跟Client相互独立,稳定性更好。共享内存虽然效率占优,但是实现起来比较复杂,没有Server跟Client的概念,需要考虑并发等难题。 - 安全性: 传统的Linux下的IPC机制无法获取可靠的
UID/PID,如果Android采用Linux下的传统IPC机制会导致系统漏洞更大。
Binder工作流程
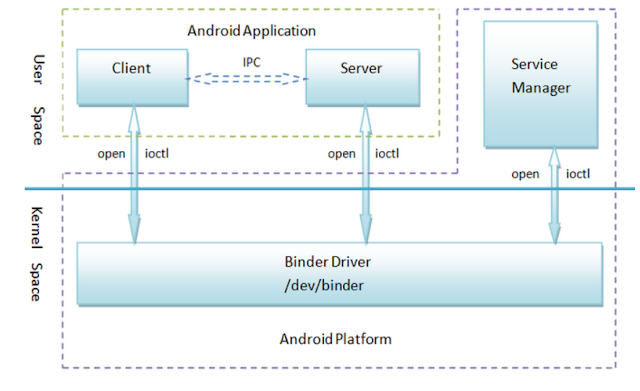
Binder的结构如下:
使用Binder流程如下:
1
2
3
1, 注册服务(addService)
2, 获取服务(getService)
3, 使用服务
注册服务
服务端需要往ServiceManager注册,ServiceManager有一个全局的service列表svcinfo,用来缓存所有服务的handler和name。
获取服务
客户端通过ServiceManager从svcinfo中查找服务,ServiceManager返回服务的引用。
使用服务
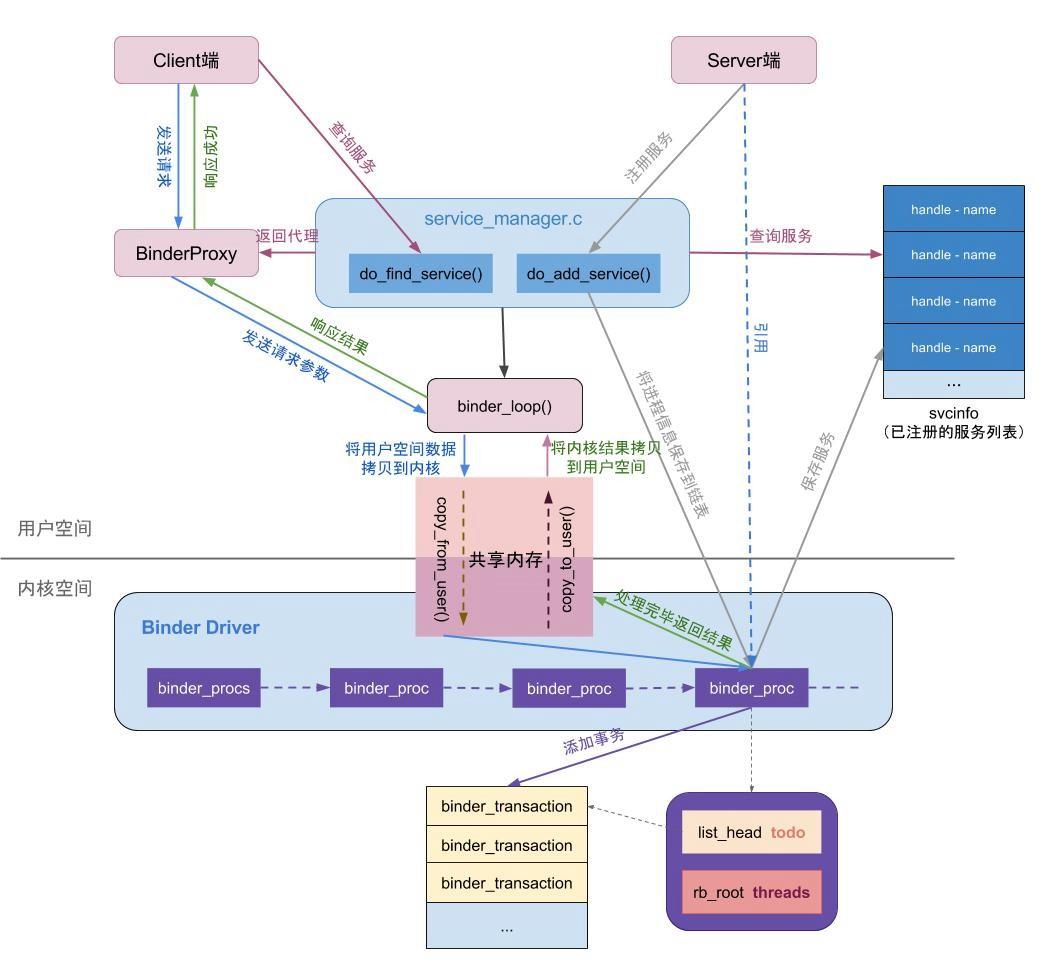
拿到服务对象后,需要向服务发送请求,实现我们需要的功能。通过 BinderProxy 将我们的请求参数发送给 内核,通过共享内存的方式使用内核方法 copy_from_user()将我们的参数先拷贝到内核空间,这时我们的客户端进入等待状态。然后 Binder 驱动向服务端的 todo队列里面插入一条事务,执行完之后把执行结果通过 copy_to_user()将内核的结果拷贝到用户空间(这里只是执行了拷贝命令,并没有拷贝数据,binder只进行一次拷贝),唤醒等待的客户端并把结果响应回来,这样就完成了一次通讯。
一次完整的Binder通信流程如下(图片来自csdn-jeanboydev):
使用Binder
使用Binder不复杂,比如实现一个查询功能,客户端C想要了解Switch卡带的价格,向服务端S进行价格查询。
服务端
服务端负责提供查询功能,开启Service等待客户端链接,也就是上面提到的注册服务。
新建一个项目,就以BinderServer命名吧,包名为
cn.xuyonghong.binderserver。
创建SwitchCassetteService提供卡带价格查询服务。
1
2
3
4
5
6
7
8
9
10
11
12
13
14
15
16
17
18
19
20
21
22
23
24
25
26
27
28
29
30
class SwitchCassetteService : Service() {

    companion object {
        const val REQUEST_CODE = 1000
    }

    private val mBinder = object : Binder() {
        override fun onTransact(code: Int, data: Parcel, reply: Parcel?, flags: Int): Boolean {
            if (code == REQUEST_CODE) {
                when (data.readString()) {
                    "Zelda" -> {
                        reply?.writeString("Zelda - ¥300.00")
                    }
                    "Mario Kart" -> {
                        reply?.writeString("Mario Kart - ¥299.00")
                    }
                    else -> {
                        reply?.writeString("未查询到该卡带价格")
                    }
                }
                return true
            }
            return super.onTransact(code, data, reply, flags)
        }
    }

    override fun onBind(intent: Intent?): IBinder {
        return mBinder
    }
}
在Manifest声明:
1
2
3
4
  <service
        android:name=".SwitchCassetteService"
        android:exported="true"
        android:process=":cassette" />
客户端
客户端负责的事情就是获取服务,使用服务。
新建项目BinderClient,准备获取并使用服务。
1
2
3
4
5
6
7
8
9
10
11
12
13
14
15
16
17
18
19
20
21
22
23
24
25
26
27
28
29
30
31
32
33
34
35
36
37
38
39
40
41
42
43
44
45
46
47
48
49
50
51
52
53
54
55
56
57
58
59
60
class MainActivity : AppCompatActivity() {

    companion object {
        const val REQUEST_CODE = 1000
    }

    private var mBinder: IBinder? = null

    private val mConnection = object : ServiceConnection {
        override fun onServiceConnected(name: ComponentName?, service: IBinder?) {
            mBinder = service
            Toast.makeText(this@MainActivity, "service is connected", Toast.LENGTH_SHORT).show()
        }

        override fun onServiceDisconnected(name: ComponentName?) {
            mBinder = null
            Toast.makeText(this@MainActivity, "service is disconnected", Toast.LENGTH_SHORT).show()
        }
    }

    private val mSwitchCassettePriceTv: TextView by lazy {
        findViewById(R.id.tv_switch_cassette_price)
    }

    override fun onCreate(savedInstanceState: Bundle?) {
        super.onCreate(savedInstanceState)
        setContentView(R.layout.activity_main)
    }

    fun query(v: View) {
        val requestData = Parcel.obtain()
        val replyData = Parcel.obtain()

        requestData.writeString("Zelda")

        try {
            mBinder?.transact(REQUEST_CODE, requestData, replyData, 0)
            mSwitchCassettePriceTv.text =
                "查询结果:${replyData.readString()}"
        } catch (e: Exception) {
            Toast.makeText(this, "Error ${e.message}", Toast.LENGTH_LONG).show()
        } finally {
            requestData.recycle()
            replyData.recycle()
        }
    }

    fun bind(v: View) {
        bindService(
            Intent().apply {
                component = ComponentName(
                    "cn.xuyonghong.binderserver",
                    "cn.xuyonghong.binderserver.SwitchCassetteService"
                )
            },
            mConnection,
            Context.BIND_AUTO_CREATE
        )
    }
}
layout_main:
1
2
3
4
5
6
7
8
9
10
11
12
13
14
15
16
17
18
19
20
21
22
23
24
25
26
27
28
29
30
31
32
33
34
35
36
<?xml version="1.0" encoding="utf-8"?>
<androidx.appcompat.widget.LinearLayoutCompat xmlns:android="http://schemas.android.com/apk/res/android"
    xmlns:app="http://schemas.android.com/apk/res-auto"
    xmlns:tools="http://schemas.android.com/tools"
    android:layout_width="match_parent"
    android:layout_height="match_parent"
    android:gravity="center"
    android:orientation="vertical"
    tools:context=".MainActivity">

    <TextView
        android:id="@+id/tv_switch_cassette_price"
        android:layout_width="wrap_content"
        android:layout_height="wrap_content"
        android:textSize="18sp" />

    <Button
        android:layout_width="wrap_content"
        android:layout_height="wrap_content"
        android:onClick="query"
        android:text="query"
        app:layout_constraintBottom_toBottomOf="parent"
        app:layout_constraintLeft_toLeftOf="parent"
        app:layout_constraintRight_toRightOf="parent"
        app:layout_constraintTop_toTopOf="parent" />

    <Button
        android:layout_width="wrap_content"
        android:layout_height="wrap_content"
        android:onClick="bind"
        android:text="bind"
        app:layout_constraintBottom_toBottomOf="parent"
        app:layout_constraintLeft_toLeftOf="parent"
        app:layout_constraintRight_toRightOf="parent"
        app:layout_constraintTop_toTopOf="parent" />
</androidx.appcompat.widget.LinearLayoutCompat>
至此一个完整的Binder使用案例就完成了。
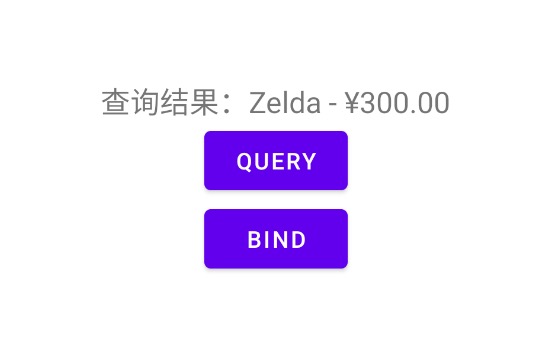
当点击BIND按钮的时候,会提示
service is connected
点击查询的时候,页面会提示:
AIDL
全称Android Interface Definition Language(Android接口定义语言),简言之就是用于B/S之间IPC通信而定义的语言,当然并不是所有的情况都需要使用AIDL,只有当
需要不同应用的客户端通过 IPC方式访问服务,并且希望在服务中进行多线程处理时才使用AIDL,如果无需多线程并发处理的情况则应该使用Binder来创建接口。
AIDL介绍,参考官方文档。
服务端
定义AIDL文件:
1
2
3
4
5
6
7
8
9
10
interface ISwitchCassette {
    /**
     * Demonstrates some basic types that you can use as parameters
     * and return values in AIDL.
     */
    void basicTypes(int anInt, long aLong, boolean aBoolean, float aFloat,
            double aDouble, String aString);

    String querySwitchCassettePrice(String cassettename);
}
向客户端公开接口:
1
2
3
4
5
6
7
8
9
10
11
12
13
14
15
16
17
18
19
20
21
22
23
24
25
26
27
28
29
30
31
32
class SwitchCassetteService : Service() {
    private val serverBinder = object:ISwitchCassette.Stub(){
        override fun basicTypes(
            anInt: Int,
            aLong: Long,
            aBoolean: Boolean,
            aFloat: Float,
            aDouble: Double,
            aString: String?
        ) {

        }

        override fun querySwitchCassettePrice(cassettename: String?): String {
            return when (cassettename) {
                "Zelda" -> {
                    "Zelda - ¥300.00"
                }
                "Mario Kart" -> {
                    "Mario Kart - ¥299.00"
                }
                else -> {
                    "未查询到该卡带价格"
                }
            }
        }

    }
    override fun onBind(intent: Intent?): IBinder {
        return serverBinder
    }
}
客户端
定义AIDL文件,跟服务端一致:
1
2
3
4
5
6
7
8
9
10
interface ISwitchCassette {
    /**
     * Demonstrates some basic types that you can use as parameters
     * and return values in AIDL.
     */
    void basicTypes(int anInt, long aLong, boolean aBoolean, float aFloat,
            double aDouble, String aString);

    String querySwitchCassettePrice(String cassettename);
}
调用IPC方法:
1
2
3
4
5
6
7
8
9
10
11
12
13
14
15
16
17
18
19
20
21
22
23
24
25
26
27
28
29
30
31
32
33
34
35
36
37
38
39
40
41
42
43
44
45
46
47
48
class MainActivity : AppCompatActivity() {

    private var mBinder: ISwitchCassette? = null

    private val mConnection = object : ServiceConnection {
        override fun onServiceConnected(name: ComponentName, service: IBinder?) {
            mBinder = ISwitchCassette.Stub.asInterface(service)
            Toast.makeText(this@MainActivity, "service is connected", Toast.LENGTH_SHORT).show()
        }

        override fun onServiceDisconnected(name: ComponentName?) {
            mBinder = null
            Toast.makeText(this@MainActivity, "service is disconnected", Toast.LENGTH_SHORT).show()
        }
    }

    private val mSwitchCassettePriceTv: TextView by lazy {
        findViewById(R.id.tv_switch_cassette_price)
    }

    override fun onCreate(savedInstanceState: Bundle?) {
        super.onCreate(savedInstanceState)
        setContentView(R.layout.activity_main)
    }

    fun query(v: View) {
        try {
            val queriedPrice = mBinder?.querySwitchCassettePrice("Zelda")
            mSwitchCassettePriceTv.text =
                "查询结果:$queriedPrice"
        } catch (e: Exception) {
            Toast.makeText(this, "Error ${e.message}", Toast.LENGTH_LONG).show()
        }
    }

    fun bind(v: View) {
        bindService(
            Intent().apply {
                component = ComponentName(
                    "cn.xuyonghong.binderserver",
                    "cn.xuyonghong.binderserver.SwitchCassetteService"
                )
            },
            mConnection,
            Context.BIND_AUTO_CREATE
        )
    }
}
Q&A
Q:AIDL中定义的方法参数前缀 in / out / inout 的作用?
A: 官方文档对于AIDL接口中定义的方法参数有以下要求。
- 方法参数必须是
- 方法可带零个或多个参数,返回值或空值。
- 所有非原语参数均需要指示数据走向的方向标记。这类标记可以是
in、out或inout。 参数修饰默认为in,不能是其他方向。
in表示数据流向是从客户端流向服务端,out表示数据流向是从服务端流向客户端,inout表示双向流通,流向的解释为任何对于参数的修改对于流向的终点都会同步。
Q:AIDL中oneway的作用?
A:官方解释,oneway用于修改远程调用的行为。使用此关键字后,远程调用不会屏蔽,而只是发送事务数据并立即返回。最终接收该数据时,接口的实现会将其视为来自 Binder 线程池的常规调用(普通的远程调用)。如果 oneway 用于本地调用,则不会有任何影响,且调用仍为同步调用。
Q:AIDL如何使用自定义参数?
A:AIDL中方法默认支持以下参数类型:
- Java 编程语言中的所有原语类型(如 int、long、char、boolean 等)
- String
- CharSequence
- List - **List 中的所有元素必须是以上列表中支持的数据类型,或者您所声明的由 AIDL 生成的其他接口或 Parcelable 类型。您可选择将 List 用作“泛型”类(例如,List
)。尽管生成的方法旨在使用 List 接口,但另一方实际接收的具体类始终是 ArrayList。** - Map - Map 中的所有元素必须是以上列表中支持的数据类型,或者您所声明的由 AIDL 生成的其他接口或 Parcelable 类型。不支持泛型 Map(如 Map<String,Integer> 形式的 Map)。尽管生成的方法旨在使用 Map 接口,但另一方实际接收的具体类始终是 HashMap。
如果要传递自定义的参数需要实现Parcelable接口。